Author Topic: How To: 2006 (GD) STI spark plug change  (Read 6351 times)

0 Members and 1 Guest are viewing this topic.

Offline snackers

  • WSC Pot Stick Posse
  • Rivaling ZZ-TOP
  • *****
  • Posts: 9082
  • More uneven camber than the Westerner lot
  • Location: Deadmonchuk
  • Ride: Bucket of bolts and sadness
How To: 2006 (GD) STI spark plug change
« on: May 11, 2011, 11:40:15 pm »
Here's how I did it.
If you're cool, you can do it like this too!

Note: If you break something by following these steps, good jerb. Everyone breaks stuff on their car at some point, just don't think you can blame this on me. Was I anywhere near the car when you broke it? Hell no. And if I was, it was more likely I was making some criticizing comment or mocking you, not actually doing any work.
Note2: This is a garage article. Therefore, I will preface the entire post at once with a "TWSS". There. It's been done. Now grow up.

It took me about 90 mins start to finish, and I haven't done this before.
Tools needed:
3/8 ratchet
5/8 spark plug socket (has some rubber in it to hold the spark plug in)
12mm socket
3" extension
10mm wrench/socket
spark plugs (If I have to tell you that you need spark plugs, please close your hood and don't ever touch tools again)
dielectric grease
anti-seize (the grey stuff, not copper coat)
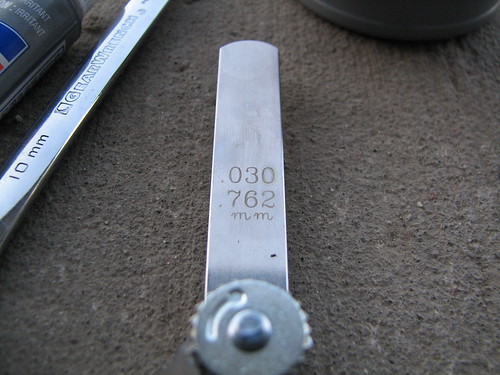
gap feeler (if plugs were not purchased from dealer. Even if they were, this is a good idea. Dealer plugs have been known to have incorrect gaps as well)
small flathead or pry tool


Not pictured:
Mechanics gloves that you will take off in the first 47 seconds of starting this job and not put back on
tunez/muzak/leprachaun playing a peaceful tune on a flute
torque wrench (good luck with that one)

Start by using the gap feeler on your plugs.
The STI wants a gap of 0.030" as per the 06 FSM.


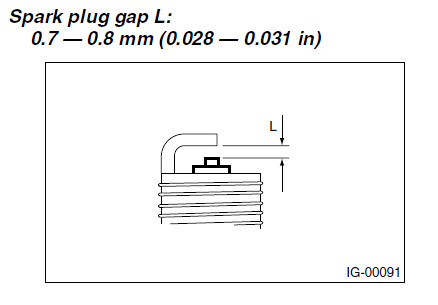
If you got the plugs from the dealer, they should be good, but check them anyways.
If you got the plugs from a parts store, the gap will be way too big.
Tap the ground lightly on something hard (garage floor) and measure.
You will only be adjusting the tiniest fraction of an inch. If you tap too hard, you'll make the gap too small.
This can be fixed by using a set of needle nose pliers and bending the ground away, but this isn't recommended.


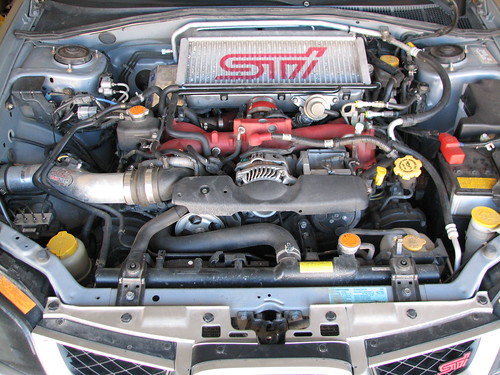
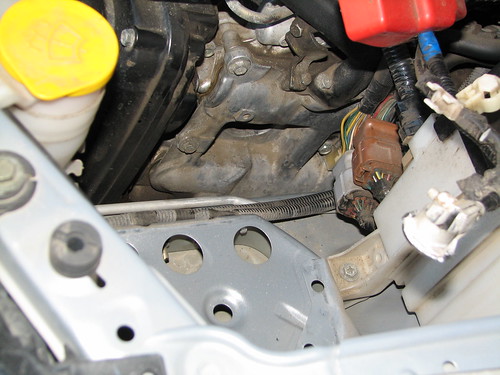
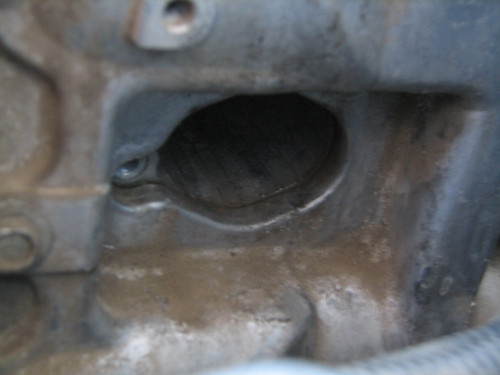
We will be working in this general area here:


Starting on the driver's side, remove the battery. (10mm wrench/socket)
If you need instructions on how to do this, please close your hood, hand me the keys to your car, and walk away.

Identify the coils. This is where you'll be working.
(Ignore the fact that one is missing, I forgot to take a pic of them both in place)


Undo the plug on the front coil, then push it out of the way.


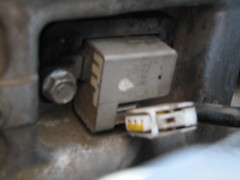
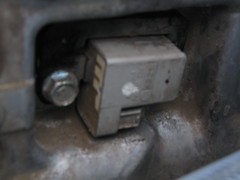
Undo the bolt (12mm) holding the coil, and pull the coil out.
Note: the bolt will not completely come out. It is held in the coil by a sleeve.


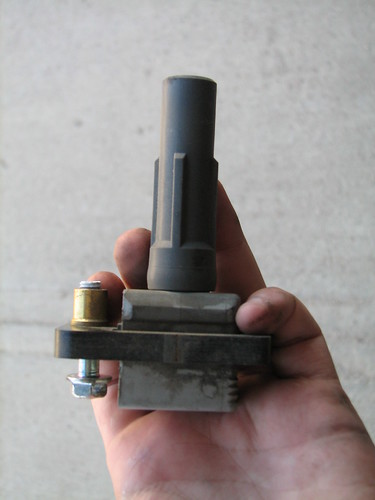
Place the coil somewhere safe.
SAFE!
If you step on this or kick it around, you'll be sorry.

Now there's a hole in the side of your engine.


And what do we do with holes?
Why, we fill them up of course!
Put the spark plug socket on the 3" extension, and put that in the hole. Use your hands to turn the contraption onto the spark plug. Obviously you can't see anything, you'll just have to do it by feel.


When the socket is on the plug, attach the ratchet and undo the plug. Depending on how long it's been in there, it might take a good tug to get it undone.
Once the seal has been broken, remove the ratchet and unscrew the plug by hand using the extension.
The front cylinders aren't bad, but the rear ones are too close to the frame to allow you to use the ratchet to do the entire job. You'll hit the frame before you get the plug out.


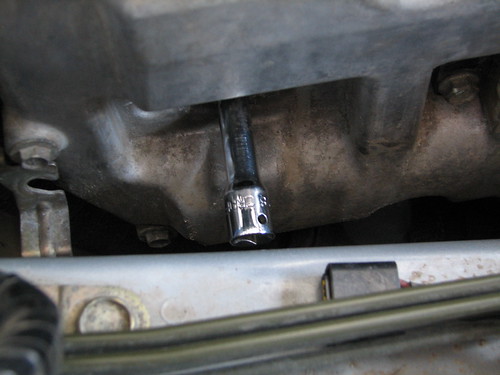
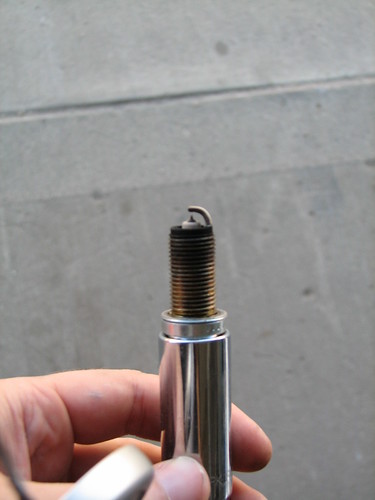
When the plug is loose, pull it out.
This is why you use a spark plug socket. The rubber inside will grab the plug.


Offline snackers

  • WSC Pot Stick Posse
  • Rivaling ZZ-TOP
  • *****
  • Posts: 9082
  • More uneven camber than the Westerner lot
  • Location: Deadmonchuk
  • Ride: Bucket of bolts and sadness
Re: How To: 2006 (GD) STI spark plug change
« Reply #1 on: May 11, 2011, 11:40:29 pm »
Do a quick inspection of the plug.
You don't need to throw it in the hoozey-whatsits electrospectromitizer graphamajig, but look for some obvious fail.
Mostly, oil. Oil on the plug will likely mean you've got a leak in the seal on the valve cover.
Keep the plug (put it in the box of the new plug) and mark which cylinder it came from to look at and analyze later. How a plug looks after it's used can give you a telling tale of how you're engine is running.

Now prep the new plug.
Put some antiseize on the threads, and a dab of dielectric grease on the end.


Place the plug into the socket, and maneuver it into its home.
Use your hands to screw the plug back in. You do not want to crossthread this.
Screw the plug in all the way until you can feel the crush washer hit the head.
Now, if you can fit a torque wrench in here to get the specified 15.2 ft-lb, then you are better than I am. I couldn't even get my tiny 3/8" tq wrench in there.
So, the backup plan is to follow the directions on the box, from the spark plug manufacturer. In the case of these NGK Iridiums, it said 1/2 to 2/3 turn.
Put the ratchet on, and tighten to those specifications.
You can CLEARLY feel when you've crushed the crushwasher and the plug is now tightening against the head (cover) within that 1/2 to 2/3 turn.

Then put the coil back in.
Note: the coil will not click or buzz or shoot off fireworks or give you a big sloppy kiss to tell you it's properly on there. If you look inside the boot, you'll see a spring. It's just held via pressure onto the spark plug.
Turn the bolt in (by hand) and then use the ratchet to tighten. Again, good luck using a torque wrench.
But just in case you want to prove you're better than me, here are the specs.


Plug the plug onto the coil. If you need, use the small screwdriver to help keep the plug straight while pushing it onto the coil.
One out of four: DONE!

Follow the same steps to do the rear drivers side. The pictures are the same, so I'm not going to repeat myself.
The space is a little tighter on the rear (heh) but I didn't have to use any special tools, universals, or lift the engine like some do.

Two out of four: DONE!

On the passenger side, remove the air intake/filter box.
Everything on the passenger side is a mirror image of the drivers side, so the steps are the same.
Just, you know... mirrored.

...with one exception.
The rear coil bolt on the passenger side also has a bracket holding the wire for the front o2 sensor.


Notice the bracket under the bolt of the rear coil (left in pic)
You will have to slide the bracket out off the bolt before you can take the coil out.


Everything else is the same.
Remove coil.
Break seal on old plug with ratchet.
Undo plug by hand (cylinder #3, you will definitely run out of space before the plug is out if you leave the ratchet on the extension)
Prep plug with grease and antiseize.
Screw plug in by hand.
Tighten with ratchet (or tq wrench) as per specs.
Replace coil.
Plug coil in.

Rinse. Repeat.

Thus concludes today's episode of Regular PITA Maintanence.
Tune in for future episodes where you might see tools fly across the garage, and hear swear words not safe for innocent children's ears.

Offline blame

  • Rivaling ZZ-TOP
  • *****
  • Posts: 1168
  • rides spanning 20 years of boosted goodness
  • Location: FSJ
  • Ride: Pretty much everything
Re: How To: 2006 (GD) STI spark plug change
« Reply #2 on: May 11, 2011, 11:44:03 pm »
nice writeup, pictures actually show what you need to see, you're obviously not from nasioc haha

lucky you don't have the son of a itchbay air pump beside the fuse block. getting that jerk out from under the A/C line was the hardest part of the whole process

-sean
AWDsome.

Offline LilDrunkenSmurf

  • Rivaling ZZ-TOP
  • *****
  • Posts: 19323
  • This is why I can't own nice things..
  • Location: Calgary
  • Ride: hopefully doesn't trigger ekai
Re: How To: 2006 (GD) STI spark plug change
« Reply #3 on: May 12, 2011, 08:36:52 am »
Key piece here: tighten the coil packs.. Ask me how I know.. :(
If the sea was vodka, and I was a duck.
I would swim to the bottom, and drink my way up.
But the sea isn't vodka, and I'm not a duck.
So give me the vodka, and stfu.
If you're having forum problems, I feel bad for you son, I got 99 problems but your post ain't one.

Offline GrantC

  • WSC Moderator
  • Rivaling ZZ-TOP
  • *
  • Posts: 13908
  • Motorsports is fun.
  • Location: St. Albert
  • Ride: Fender stripes, a high flow cat, yellow high beams, and an exhaust.
Re: How To: 2006 (GD) STI spark plug change
« Reply #4 on: May 12, 2011, 09:53:13 am »
Remove coil.
Break seal on old plug with ratchet.
Undo plug by hand (cylinder #3, you will definitely run out of space before the plug is out if you leave the ratchet on the extension)
Prep plug with grease and antiseize.
Screw plug in by hand.
Tighten with ratchet (or tq wrench) as per specs.
Replace coil.
Plug coil in.

Realize you forgot to put the bracket for the O2 sensor wire back on.
Loosen bolt on rear coilpack.
Put F#$%ing bracket on.
Tighten bolt on rear coilpack, again...

Offline Munky

  • Rivaling ZZ-TOP
  • *****
  • Posts: 1389
  • Location: Edmonton
  • Ride: '06 WRX
Re: How To: 2006 (GD) STI spark plug change
« Reply #5 on: May 12, 2011, 10:56:28 am »
Much better how to then I could ever find.

One note for driver rear plug,  some people (including me) needed to turn the coil 180* (up side down) to clear the frame to get it out.

Offline Perfect Dark

  • WSC Supporter
  • Rivaling ZZ-TOP
  • *****
  • Posts: 6559
  • Location: Calgary
  • Ride: Wagoon!
Re: How To: 2006 (GD) STI spark plug change
« Reply #6 on: May 12, 2011, 12:07:04 pm »
Much better how to then I could ever find.

One note for driver rear plug,  some people (including me) needed to turn the coil 180* (up side down) to clear the frame to get it out.

Same, mine never would have come out without flipping it around first.

Offline Corey

  • Patchy Faced
  • ***
  • Posts: 431
  • Ride: 2006 STi, 2007 Daytona 675, 2003 Race R6, 2015 Race 675R, 2013 1199 Panigale R
Re: How To: 2006 (GD) STI spark plug change
« Reply #7 on: May 17, 2011, 08:37:28 pm »
also note, if you dont have the socket wrench with the rubber on it, magnetic rods are always a life saver ;)


EMRA #17

Castrol Roadcourse 1:21.9

Offline Infusion

  • Patchy Faced
  • ***
  • Posts: 255
  • Location: Calgary
  • Ride: STI
Re: How To: 2006 (GD) STI spark plug change
« Reply #8 on: May 26, 2011, 09:17:57 pm »
change my plugs today and it was a pain in the a hole rear plug on driver side had no room for any of the tools

Offline jutes

  • WSC Pot Stick Posse
  • Rivaling ZZ-TOP
  • *****
  • Posts: 5532
  • Location: Sask
  • Ride: Chev // 18’ X1
Re: How To: 2006 (GD) STI spark plug change
« Reply #9 on: May 26, 2011, 09:23:38 pm »
change my plugs today and it was a pain in the a hole rear plug on driver side had no room for any of the tools

Universals work awesome.

Offline Munky

  • Rivaling ZZ-TOP
  • *****
  • Posts: 1389
  • Location: Edmonton
  • Ride: '06 WRX
Re: How To: 2006 (GD) STI spark plug change
« Reply #10 on: May 26, 2011, 11:57:51 pm »
change my plugs today and it was a pain in the a hole rear plug on driver side had no room for any of the tools

My setup...

Offline ultimatt

  • WSC Supporter
  • Rivaling ZZ-TOP
  • *****
  • Posts: 2940
  • Thrusting in the direction of the problem.
  • Location: Edmonton
  • Ride: Thundercougarfalconbird
<+  Hurrbie> becuase ultimasshole

Offline snackers

  • WSC Pot Stick Posse
  • Rivaling ZZ-TOP
  • *****
  • Posts: 9082
  • More uneven camber than the Westerner lot
  • Location: Deadmonchuk
  • Ride: Bucket of bolts and sadness
Re: How To: 2006 (GD) STI spark plug change
« Reply #12 on: May 27, 2011, 12:20:15 am »
Crazy.

I'm not trying to show off or brag.
I really didn't use anything other than the spark plug socket, a 3" extension, and a 3/8" drive.
Once the plug was "broken" free, I took off the ratchet and did the rest by hand using the extension.

Offline Munky

  • Rivaling ZZ-TOP
  • *****
  • Posts: 1389
  • Location: Edmonton
  • Ride: '06 WRX
Re: How To: 2006 (GD) STI spark plug change
« Reply #13 on: May 27, 2011, 12:41:42 am »
I ended up doing that for the driver rear because for what ever reason (may have been me missing something) I couldn't get the air pump out.

/hijack

Offline Prelude

  • Beards Comin in Nice
  • ****
  • Posts: 942
  • Location: Edmonton
  • Ride: Black WRX Sedan "B-Rex"
Re: How To: 2006 (GD) STI spark plug change
« Reply #14 on: July 03, 2011, 06:54:04 pm »
Thanks for the write up it was extremely helpfully

Sent from my Nexus S using Tapatalk
Avatar Photo taken by gscratch

Offline Klautt

  • Beards Comin in Nice
  • ****
  • Posts: 991
  • Location: Fort McMurray
  • Ride: 05 STi -> Volvo V70R -> 09 WRX Hatchback.
Re: How To: 2006 (GD) STI spark plug change
« Reply #15 on: October 07, 2011, 04:58:57 am »
Using this soon, thanks. Linking the tread below as  I was curious about which cylinder was which and also going to check out a missfire I have.

http://www.westernsubaruclub.com/smf/index.php?topic=21489.0

Offline GrantC

  • WSC Moderator
  • Rivaling ZZ-TOP
  • *
  • Posts: 13908
  • Motorsports is fun.
  • Location: St. Albert
  • Ride: Fender stripes, a high flow cat, yellow high beams, and an exhaust.
Re: How To: 2006 (GD) STI spark plug change
« Reply #16 on: March 24, 2012, 04:53:34 pm »
...

Now prep the new plug.
Put some antiseize on the threads, and a dab of dielectric grease on the end.

Follow up...

I prefer to put the dielectric grease on the coilpack, or reach in & put it on after the plugs in.
Reason being, I've had more than a few sparkplug sockets develop quite the suction & happily come off the extension rather than coming off the plug.

Offline cheech00TS

  • Patchy Faced
  • ***
  • Posts: 361
  • Location: Edmonton
  • Ride: 2011 WRB Impreza Ltd wagon
Re: How To: 2006 (GD) STI spark plug change
« Reply #17 on: April 25, 2012, 12:30:57 pm »
Thanks Snackers, good write-up. Gave me the confidence to knock this job out during my split this morning. Only had one problem; drivers side rear plug was a PITA but rolling the coil pack out towards the back of the firewall seemed to work great. Hope that helps others out.
'06 2.5i Wagon: 60KM->sold
'01 Forester S: 217KM->sold
'10 2.5i Wagon: gone...
'07 WRX Wagon: 167,xxx really fun kms!
'11 2.5i Limited Wagon

Offline DeleriousZ

  • Patchy Faced
  • ***
  • Posts: 485
  • Back in a Suby
  • Location: Calgary SE
  • Ride: 98 2.5rs, 88 300zx x2. 04.5 GLI.
Re: How To: 2006 (GD) STI spark plug change
« Reply #18 on: June 21, 2012, 10:33:11 pm »
Great writeup! These are the ones I like to see. Well thought out and good pictures.

Offline krarks

  • Stubbly Faced
  • **
  • Posts: 42
  • Ain't nobody got time for dat!
  • Location: Regina, SK
  • Ride: 2005 STi
How To: 2006 (GD) STI spark plug change
« Reply #19 on: December 01, 2012, 04:03:13 pm »
Ill add that NGK advises AGAINST the use of anti seize compound on their plugs. You can actually make matters worse if you use it on their plugs. (not saying you will 100% for sure, but it could happen!) You're not doing yourself any favors by using anti seize on them!

Source:

http://www.ngksparkplugs.com/pdf/tb-0630111antisieze.pdf
2005 Subaru Impreza WRX STi

Offline Ambystom01

  • WSC Pot Stick Posse
  • Rivaling ZZ-TOP
  • *****
  • Posts: 12502
  • Not contributing to WSC since 2008
  • Location: Deadmonton
  • Ride: 2015 VW tree-killer, 1990 Mazda hairdresser
Re: How To: 2006 (GD) STI spark plug change
« Reply #20 on: December 01, 2012, 04:15:42 pm »
That's why you use a torque wrench and practice some common sense.
Quote from: mudferret
Ambystom01 shows the funny picture whom is thine boss.


Offline snackers

  • WSC Pot Stick Posse
  • Rivaling ZZ-TOP
  • *****
  • Posts: 9082
  • More uneven camber than the Westerner lot
  • Location: Deadmonchuk
  • Ride: Bucket of bolts and sadness
Re: How To: 2006 (GD) STI spark plug change
« Reply #21 on: December 01, 2012, 04:36:54 pm »
You're not doing yourself any favors by using anti seize on them!
You are, actually. But there's another entire thread arguing this, so I'm not going to go through it again.
Use it or don't, it's your car.
Search nabisco/iwsti for the number of plugs that have seized to the block.

That's why you use a torque wrench...
Ha.
haha.
hahhahahhah.
laff.

When you do your plugs, be sure and get a picture of you using a tq wrench to tighten them.

Offline Ambystom01

  • WSC Pot Stick Posse
  • Rivaling ZZ-TOP
  • *****
  • Posts: 12502
  • Not contributing to WSC since 2008
  • Location: Deadmonton
  • Ride: 2015 VW tree-killer, 1990 Mazda hairdresser
Re: How To: 2006 (GD) STI spark plug change
« Reply #22 on: December 01, 2012, 04:37:58 pm »
I did the plugs on my WRX, a torque wrench was a no go so common sense had to do.
Quote from: mudferret
Ambystom01 shows the funny picture whom is thine boss.


Offline Jay89

  • Rivaling ZZ-TOP
  • *****
  • Posts: 1494
  • Location: Edmonton
  • Ride: 2007 WRX airboy tuned, 2017 Lexus IS350
Re: How To: 2006 (GD) STI spark plug change
« Reply #23 on: December 01, 2012, 04:47:45 pm »
I've used a torque wrench both times I did my plugs on my wrx...although I did remove battery and airbox

341awhp ~330awtq
Project Car

Offline GrantC

  • WSC Moderator
  • Rivaling ZZ-TOP
  • *
  • Posts: 13908
  • Motorsports is fun.
  • Location: St. Albert
  • Ride: Fender stripes, a high flow cat, yellow high beams, and an exhaust.
Re: How To: 2006 (GD) STI spark plug change
« Reply #24 on: December 01, 2012, 05:03:15 pm »
I've used a torque wrench both times I did my plugs on my wrx...although I did remove battery and airbox

Those aren't the issue, the framerails are.