Author Topic: How To: Hardwire an accessory to roof plug (camera, radar)  (Read 1810 times)

0 Members and 1 Guest are viewing this topic.

Offline snackers

  • WSC Pot Stick Posse
  • Rivaling ZZ-TOP
  • *****
  • Posts: 9082
  • More uneven camber than the Westerner lot
  • Location: Deadmonchuk
  • Ride: Bucket of bolts and sadness
How To: Hardwire an accessory to roof plug (camera, radar)
« on: January 03, 2013, 10:28:19 pm »
I bought a Blackvue Car Camera a while ago.
The power cord that it comes with is long enough to trace it down the A pillar and into the cig lighter, but I wanted to make it easily removeable to swap between cars.

Blackvue does sell a power kit (that also allows you to keep it recording while the car isn't on, and prevent battery drain) but it's expensive, and I didn't think it was necessary for my needs.
Since all 2000(ish) and later subarus have a harness in the roof for the compass mirror, I figured I'd just tap into this ACC power line.
The connector for the compass mirror has power/ground ACC lines that you can use if you only want power while the key is on.

Therefore, the purpose of this how to:

How to tap into ACC power for a roof accessory

This how to was done on a 2005 Forester XT. There are minor differences in the GD impreza with the roof console, but the wiring should be the same.
There are some tips spread throughout this post, so I suggest you read it in it's entirety before you start so that you can plan how to do your wiring. Otherwise, you may end up soldering your left signal wire to the rear seatbelt clip. No one wants that, especially Gramma. How are you going to explain to her why she's getting a nice buzzing jolt to the buttockal area when you turn your camera on?

Tools and stuff required
Philips screwdriver
Flathead screwdriver
15A fuse (or not, just be smarter than me)
Basic wiring skills
A place to throw your tools when you're mad
Wire cutters
Soldering iron (if you want to do it properly)
Various wiring connector bits (spades, vampire clips, crimp connectors, whatever applies)

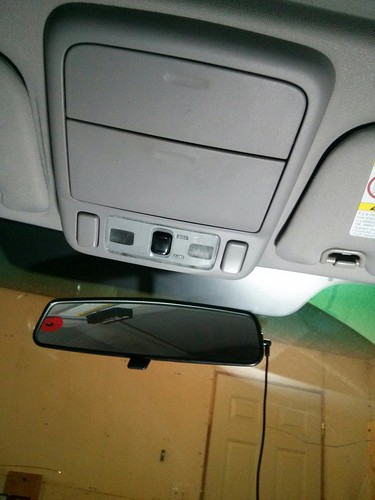
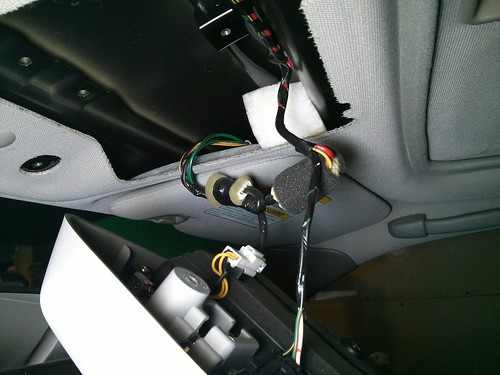
We'll be working in this general area here:


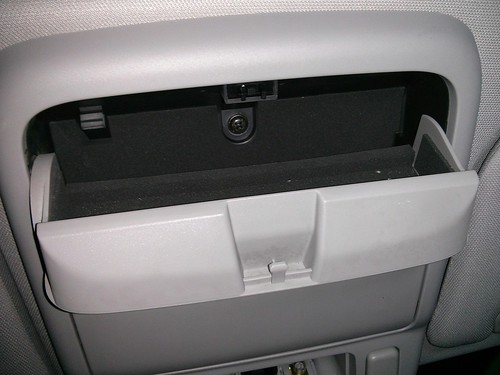
Remove the upper console to gain access to the wires.
Here it is, in case you're unfamiliar with what the upper console looks like.


Start by undoing the light cover. Shove a flathead screwdriver in the slot and pry it out.
No pics.
Just do it.


Undo those 2 screws you've just exposed.
There's one more screw under the rear most door.


Now be polite, and turn your head while she exposes all her naughty bits to you.


If you aren't currently using a compass/homelink mirror, then the unused plug you're looking for is in the middle with foam and tape around it.
If you are using the compass mirror, then it'll be the plug that goes to your compass mirror. Follow the wires... no, not the ones that lead to the lights... right. Yes, that one. The one you have your finger on. That one.

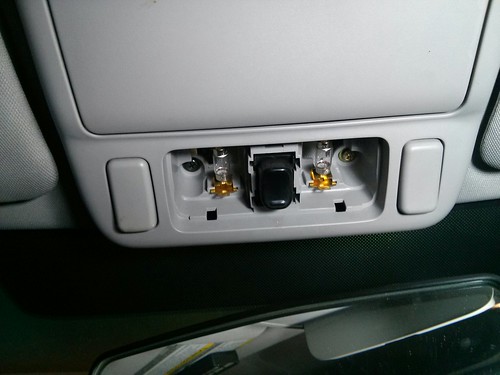
Undo the plug from the tape so that you can access the wires and junk inside.


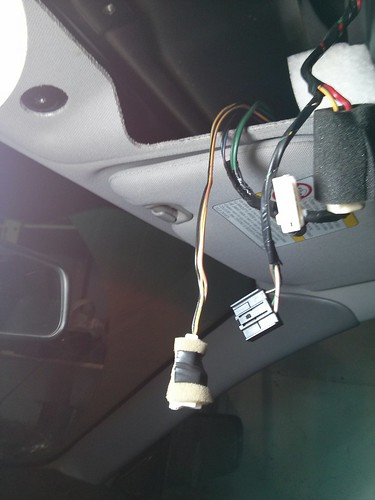
Figure out which wires are power and ground.
There will be a 3rd wire that is used to detect reverse, to disable the autodim on the powered mirror.
You don't care about this wire. Only power and ground.

You can see here that we have yellow-green, black, and brown-yellow.


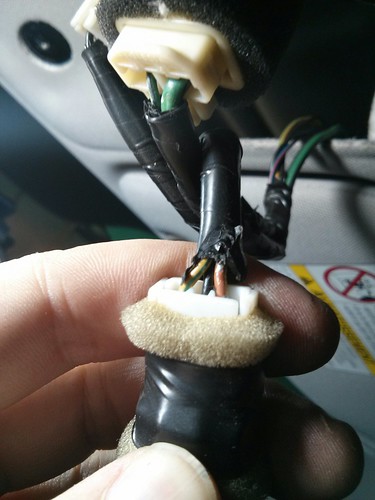
Now if you'll kindly head to your fancy FSM, you can easily see what's going on here.


YG is power, and B is ground.
Note, these wire colors MAY be different on an impreza/outback/whateverthehellswapyou'reworkingon/tribeca, so please refer to the wiring diagrams for your car.

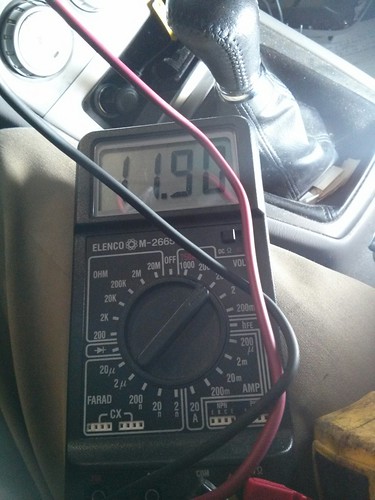
If you're really paranoid, get a multimeter, and test out the one you think is power.
(Hint: you'll have to turn your key on to get power to this line. That's why I've called this the ACC power line how to)


Of note, if you accidentally the lead between power and ground, and hear a *pop* and your radio stops working... you've just blown a fuse.
Now, I wouldn't have any idea about this but just in case you need to know, here's what a blown 15A fuse looks like.


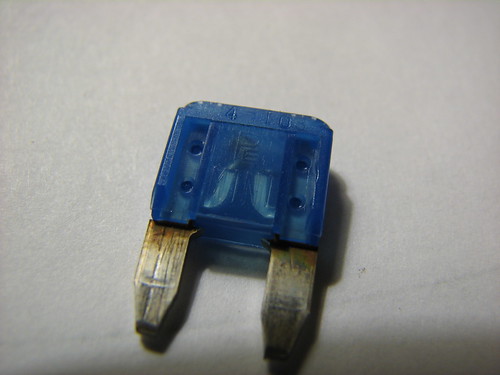
Totally a random internet image search for blown fuse... I swear.

So now's the fun part.
Decide how you're going to wire in your whatever doohicky beepily jiggamihoozits.
Are you going to solder it in permanently? Vampire tap the lines?

I am wiring in a 12V cig lighter because that's what the blackvue uses, and I also want the blackvue removable so I can swap it between cars.
Additionally, I've decided to use spade connectors in case I want to remove the socket in the future.

ON TO THE SHOW!

...we'll return after these messages brought to you by who the hell cares.

Offline snackers

  • WSC Pot Stick Posse
  • Rivaling ZZ-TOP
  • *****
  • Posts: 9082
  • More uneven camber than the Westerner lot
  • Location: Deadmonchuk
  • Ride: Bucket of bolts and sadness
Re: How To: Hardwire an accessory to roof plug (camera, radar)
« Reply #1 on: January 03, 2013, 10:28:28 pm »

Offline snackers

  • WSC Pot Stick Posse
  • Rivaling ZZ-TOP
  • *****
  • Posts: 9082
  • More uneven camber than the Westerner lot
  • Location: Deadmonchuk
  • Ride: Bucket of bolts and sadness
Re: How To: Hardwire an accessory to roof plug (camera, radar)
« Reply #2 on: January 03, 2013, 10:28:40 pm »
ON TO THE REAL SHOW!!

There's no turning back now.


IMPORTANT NOTE! Do not cut your ground and power wires right beside each other at the same place. If for whatever reason these connections touch, they will short (refer to previous totally random completely unexplainable blown fuse) Make the cuts an inch or two away from each other.

Now, if you were doing this properly, you'd solder this connection. Unfortunately, I don't have a bluewrench handy and I wasn't too keen on burning down my interior.


I'm not telling you how to crimp these together. If you can't do that, you shouldn't be splicing into your cars very complicated and nearly-impossible-to-replace wiring harness. This is basic electric wiring skills.

Power line.


And the wires from the 12V socket.


You'll note I put different connectors on power and ground. This is because all the males are blue, and females are red (at least, in my fancy high quality very expensive Princess Auto "Timmy's First Wiring Kit") and I wanted to make sure and not accidentally the power into the ground and vice versa.
So now I know, blue connects to red and red connects to blue. (you'll see later)

Now, prepare the console.
If you are permanently wiring the device to these wires, then you don't need to do anything. Just run the wires between the console and roof.
I, however, will be storing this connection *in* the console for easy disconnect.
You'll see what I mean.

...no really. Remember how I told you earlier to read the whole post? If you've cut your wires and now have no idea what to do... just give me the keys to your car. You've lost your privileges. Go sit in the corner.

I drilled a hole where I want the wires to come through, and where they won't interfere with the "folding" that the door does, nor the wires above it that will all be shoved in there.


Left of the plug.


Fish the device/plug wires through.


Plug your new connections together.
Remember? Red to blue and blue to red.
Now what would you have done if the harness side was all red, and the plug side all blue?
Guaranteed you would have imploded the universe, and no one would have had any warning. At least we got warning when they did itshay at the Hadron Collider. Can't you be as considerate?


If you were a skilled and respectable Electrical Engineer of sorts, you would have a) soldered these together properly, and 7) used heatshrink, as well as Q) not made the connections right beside each other as warned earlier.
I am not one of these people.


Mount the console back into place.


Shove all your bits into place.
Or don't, whatever. Be your own person and stop copying me.


Clean and tidy.


At some point along the way, you probably should have tested your wiring to make sure it worked before buttoning everything back up.
I did not, and waited until everything was complete once and for all.
"But..." you say.
ONCE AND FOR ALL!


SUCCESS!!
Blue lights always indicate success.
Unless you're in japan. Then success is red, because, you know...
The blackvue was made in Korea, so it isn't backwards.

View from the driver's seat.


Mounted and operational.


Thus concludes this edition of Let's Make EEs and Electricians Cringe.
Now get out there, and save some lives.

Offline ultimatt

  • WSC Supporter
  • Rivaling ZZ-TOP
  • *****
  • Posts: 2940
  • Thrusting in the direction of the problem.
  • Location: Edmonton
  • Ride: Thundercougarfalconbird
Re: How To: Hardwire an accessory to roof plug (camera, radar)
« Reply #3 on: January 04, 2013, 12:06:08 am »
Is there a way to use the 12V plug and still have it constantly on? (For parking mode or whatever it is)

Also, I have a forester and one of these cameras. Let's underhand it in there one of these days.

What are you using to mount it so that it's removable?
<+  Hurrbie> becuase ultimasshole

Offline snackers

  • WSC Pot Stick Posse
  • Rivaling ZZ-TOP
  • *****
  • Posts: 9082
  • More uneven camber than the Westerner lot
  • Location: Deadmonchuk
  • Ride: Bucket of bolts and sadness
Re: How To: Hardwire an accessory to roof plug (camera, radar)
« Reply #4 on: January 04, 2013, 12:12:11 am »
Use any wire that has constant power, like the ones for the map lights.
But you'd probably want to get the powersmart doohicky from pittasoft, so that it monitors your battery voltage and doesn't run it dry.

I used this to mount the camera.
http://www.homedepot.ca/product/velcro-4-in-x-2-in-industrial-strength-strips-2-pack/984103

Offline KennyB

  • Rivaling ZZ-TOP
  • *****
  • Posts: 2003
  • Location: Edmonton
  • Ride: 05 STi
Re: How To: Hardwire an accessory to roof plug (camera, radar)
« Reply #5 on: January 04, 2013, 08:50:27 am »
Nice write up! I did it very much the same for my "If your doing something you shouldn't you just got busted notification" (radar detector) however wired it through the stem for the rearview mirror.

Pull down the headliner a bit to fish out the power and ground for the mirror, chop the 12v plug off the cable, vampire clips and done. Has worked perfectly for 2 years and turns off and on automatically.